MP
MyBatis Plus
简介
特点
- 无侵入:只做增强不做改变,引入它不会对现有工程产生影响,如丝般顺滑
- 损耗小:启动即会自动注入基本 CURD,性能基本无损耗,直接面向对象操作
- 强大的 CRUD 操作:内置通用 Mapper、通用 Service,仅仅通过少量配置即可实现单表大部分 CRUD 操作,更有强大的条件构造器,满足各类使用需求
- 支持 Lambda 形式调用:通过 Lambda 表达式,方便的编写各类查询条件,无需再担心字段写错
- 支持主键自动生成:支持多达 4 种主键策略(内含分布式唯一 ID 生成器 - Sequence),可自由配置,完美解决主键问题
- 支持 ActiveRecord 模式:支持 ActiveRecord 形式调用,实体类只需继承 Model 类即可进行强大的 CRUD 操作
- 支持自定义全局通用操作:支持全局通用方法注入( Write once, use anywhere )
- 内置代码生成器:采用代码或者 Maven 插件可快速生成 Mapper 、 Model 、 Service 、 Controller 层代码,支持模板引擎,更有超多自定义配置等您来使用
- 内置分页插件:基于 MyBatis 物理分页,开发者无需关心具体操作,配置好插件之后,写分页等同于普通 List 查询
- 分页插件支持多种数据库:支持 MySQL、MariaDB、Oracle、DB2、H2、HSQL、SQLite、Postgre、SQLServer 等多种数据库
- 内置性能分析插件:可输出 Sql 语句以及其执行时间,建议开发测试时启用该功能,能快速揪出慢查询
- 内置全局拦截插件:提供全表 delete 、 update 操作智能分析阻断,也可自定义拦截规则,预防误操作
什么是MyBatisPlus
- MyBatis是一款优秀的持久层框架,用于简化JDBC开发
- MyBatisPlus是基于MyBatis框架基础上开发的增强型工具,皆在简化开发,提高效率
持久层
- 负责将数据保存倒数据库那一层代码
- JavaEE三层架构:表现层,业务层,持久层
框架
- 框架就是一个半成品软件,是一套可重用的,通用的,软件基础代码模型
- 在框架的基础之上构建软件编写更加高效,规范,通用,可扩展
入门案列
- SpringBoot整合MyBatis开发过程
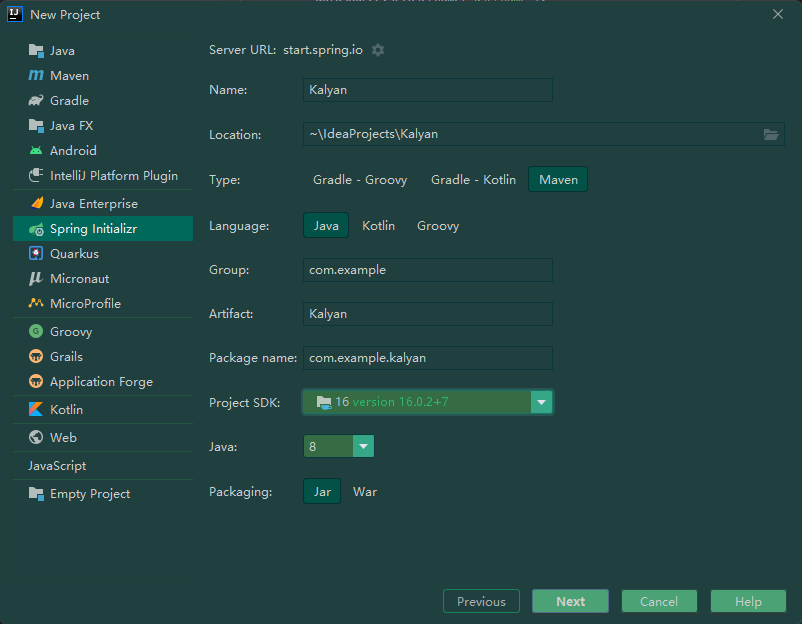
- 创建SpringBoot工程
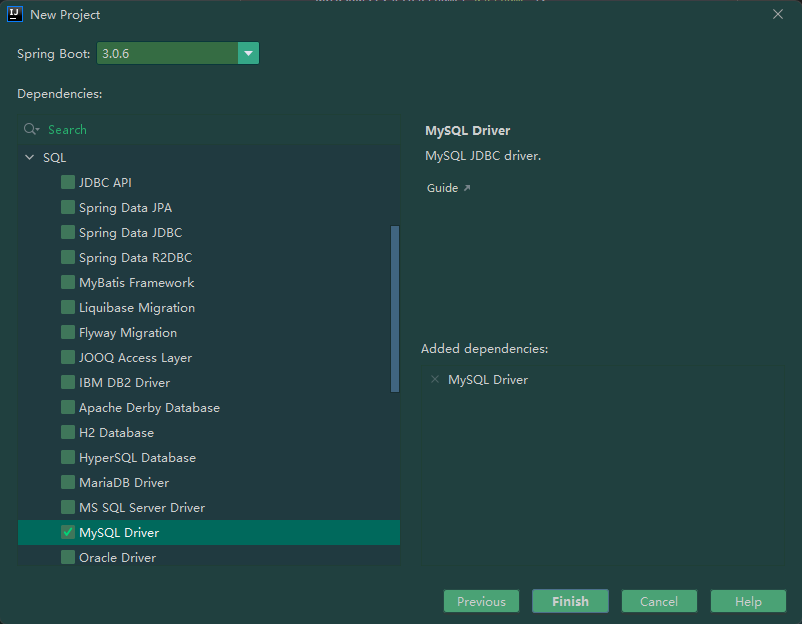
- 勾选配置使用的技术
- 设置dataSource相关属性(JDBC参数)
- 定义数据层接口映射配置
Spring:
datasource:
type: com.alibaba.druid.pool.DruidDataSource
driver-class-name: com.mysql.cj.jdbc.Driver
url: jdbc:mysql://localhost:3306/mybatisplus_db?serverTimezone = UTC
username: ?
password: ?
public interface UserDao extends BaseMapper<?>{
public User getById(Long id);
}
实际操作
创建SpringBoot工程

添加依赖MySQL Driver
打开xml文件,手动添加mybatis-plus-boot-start依赖
<dependency> |
mybatis-plus-boot-start
这是Maven依赖,用于引入MyBatis Plus框架的快速启动器。MyBatis Plus是一个增强版的MyBatis框架,提供了许多MyBatis没有的方便实用的功能,例如自动代码生成、分页插件、多数据源支持、性能优化等。
在pom.xml中引入了这个依赖后,就可以开始使用MyBatis Plus。可以在配置文件中添加MyBatis Plus的配置,如:
mybatis-plus: |
在这里,typeAliasesPackage是指实体类所在的包,mapperLocations是指MyBatis mapper XML文件的位置,global-config是MyBatis Plus的全局配置,在这里修改了ID的生成策略和开启了下划线到驼峰命名的自动转换。
然后,可以像平常一样编写MyBatis mapper XML文件和DAO接口,如:
<!-- demo.xml --> |
// DemoDAO.java |
在编写DAO接口时,可以继承MyBatis Plus提供的BaseMapper< T >接口,该接口提供了许多便捷的CRUD方法。此外,也可以编写自定义SQL语句,既具有MyBatis的灵活性,又能充分利用MyBatis Plus提供的便利性。最后,在使用DAO接口时,可以像平常一样使用Spring的@Autowired注解来注入DAO对象,例如:
@Autowired |
打开xml文件,手动添加com.baomidou依赖
这是Maven依赖,用于引入MyBatis Plus框架的快速启动器。MyBatis Plus是一个增强版的MyBatis框架,提供了许多MyBatis没有的方便实用的功能,例如自动代码生成、分页插件、多数据源支持、性能优化等。
在pom.xml中引入了这个依赖后,就可以开始使用MyBatis Plus。可以在配置文件中添加MyBatis Plus的配置,如:
mybatis-plus: |
在这里,typeAliasesPackage是指实体类所在的包,mapperLocations是指MyBatis mapper XML文件的位置,global-config是MyBatis Plus的全局配置,在这里修改了ID的生成策略和开启了下划线到驼峰命名的自动转换。
然后,可以像平常一样编写MyBatis mapper XML文件和DAO接口,如:
<!-- demo.xml --> |
// DemoDAO.java |
在编写DAO接口时,可以继承MyBatis Plus提供的BaseMapper< T >接口,该接口提供了许多便捷的CRUD方法。此外,也可以编写自定义SQL语句,既具有MyBatis的灵活性,又能充分利用MyBatis Plus提供的便利性。
最后,在使用DAO接口时,可以像平常一样使用Spring的@Autowired注解来注入DAO对象,例如:
|
MyBatis Plus提供了许多易用的API,通过使用它们可以大大提升代码的开发效率。
配置resources
- 添加datasource
spring:
  datasource:
    type: com.alibaba.druid.pool.DruidDataSource
    driver-class-name: com.mysql.cj.jdbc.Driver
    url: jdbc:mysql://localhost:3306/mybatisplus?serverTimezone=UTC
    username: ?
    password: ?
创建实体类
//以上图为例
ackage domain;
import lombok.Data;
//这里用到了lombok,后续会讲
public class User {
private Long id;
private String name;
private String email;
private Integer age;
}
核心功能
| 操作类型 | 方法调用示例 | SQL示例 |
|---|---|---|
| 插入操作 | mapper.insert(entity); |
INSERT INTO table (column1, column2, ...) VALUES (?, ?, ...); |
| 更新操作 | mapper.updateById(entity); |
UPDATE table SET column1=?, column2=?, ... WHERE id=?; |
| 删除操作 | mapper.deleteById(1); |
DELETE FROM table WHERE id=?; |
| 查询单个对象 | mapper.selectById(1); |
SELECT * FROM table WHERE id=?; |
| 查询多个对象 | mapper.selectList(null); |
SELECT * FROM table; |
| 条件查询 | mapper.selectList(queryWrapper); |
SELECT * FROM table WHERE column1=value1 AND column2>value2; |
| 分页查询 | mapper.selectPage(page, queryWrapper); |
SELECT COUNT(1) FROM table; SELECT * FROM table WHERE column1=value1 LIMIT startIndex, pageSize; |
实体类开发工具lombok
//依赖导入 |
以下是 Lombok 常用的注解和对应的方法:
| 注解 | 解释 | 方法示例 |
|---|---|---|
| @Data | 自动生成各种方法,包括 getter/setter/toString/hashCode/equals | @Data class T {private String name;} |
| @Getter/@Setter | 自动生成 getter/setter 方法 | @Getter @Setter private String name; |
| @ToString | 自动生成 toString 方法 | @ToString(of = {"name", "age"}) class T {private String name; private int age;} |
| @EqualsAndHashCode | 自动生成 hashCode 和 equals 方法 | @EqualsAndHashCode(of = {"name", "age"}) class T {private String name; private int age;} |
| @NoArgsConstructor | 自动生成无参构造方法 | @NoArgsConstructor class T {} |
| @RequiredArgsConstructor | 自动生成必须参数的构造方法 | @RequiredArgsConstructor class T { private final String name; private final int age; } |
| @AllArgsConstructor | 自动生成全参构造方法 | @AllArgsConstructor class T { private String name; private int age; } |
| @Builder | 自动生成建造者模式方法,用于链式调用 | @Builder class T {private String name; private int age;} |
| @Slf4j | 自动生成 log 变量,方便日志输出 | @Slf4j class T {private static final Logger log = LoggerFactory.getLogger(T.class);} |
使用 Lombok 可以大大简化 POJO 类编写的过程。不需要手动编写重复的 getter/setter/toString/hashCode/equals 等方法,可以提高开发效率。同时,Builder 注解生成的建造者模式方法可以使代码更加简洁易读。
标准分页功能
boot配置日志开启
mybatis-plus: |
基本方法
下面是 IPage<T> 接口中常用的方法:
| 方法 | 说明 |
|---|---|
List<T> getRecords() |
获取当前页数据 |
long getTotal() |
获取总记录数 |
IPage<T> setTotal(long total) |
设置总记录数,并返回当前对象 |
long getSize() |
获取当前页大小 |
IPage<T> setSize(long size) |
设置当前页大小,并返回当前对象 |
long getCurrent() |
获取当前页数 |
IPage<T> setCurrent(long current) |
设置当前页数,并返回当前对象 |
long getPages() |
获取总页数 |
IPage<T> setPages(long pages) |
设置总页数,并返回当前对象 |
List<OrderItem> orders() |
获取排序字段信息 |
IPage<T> setOrders(List<OrderItem> orders) |
设置排序字段信息,并返回当前对象 |
boolean optimizeCountSql() |
是否进行 count SQL 优化 |
IPage<T> setOptimizeCountSql(boolean optimizeCountSql) |
设置 count SQL 优化标识,并返回当前对象 |
boolean isSearchCount() |
是否进行 count SQL 查询 |
IPage<T> setSearchCount(boolean isSearchCount) |
设置 count SQL 查询标识,并返回当前对象 |
Map<String, Object> condition() |
获取查询条件信息 |
IPage<T> setCondition(Map<String, Object> condition) |
设置查询条件信息,并返回当前对象 |
List<T> getRecords(boolean optimizeCountSql, boolean isSearchCount) |
获取当前页数据,并选择是否进行 count SQL 优化和 count SQL 查询 |
IPage<T> convert(Function<? super T, ? extends U> converter) |
转换当前 IPage<T> 为 IPage<U> |
MP拦截器
//类似于一个插件功能,但是不实现的话就可能实现不了分页功能 |
//同样能够实现上面的方法 |
sql语句打印配置,运行日志
mybatis-plus: |
杀掉多余得数据显示
logback.xml |
//在Spring工程生成原生得xml进行配置 |
DQL编程控制
条件查询
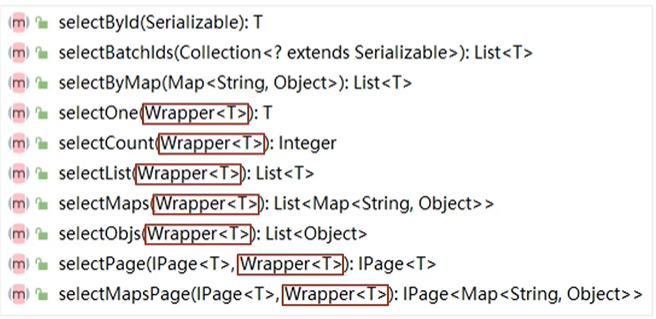
- MyBatisPlus将书写复杂的SQL查询条件进行封装

- 其中Wrapper< T >就是对查询条件的封装
添加QueryWrapper对象
QueryWrapper qw = new QueryWrapper(); |
| 方法名 | 解释 |
|---|---|
eq() |
等于 |
ne() |
不等于 |
gt() |
大于 |
ge() |
大于等于 |
lt() |
小于 |
le() |
小于等于 |
between() |
在两个值之间 |
notBetween() |
不在两个值之间 |
like() |
模糊查询 |
notLike() |
不匹配某个值的模糊查询 |
isNull() |
为空 |
isNotNull() |
不为空 |
in() |
包含在某个集合中 |
notIn() |
不包含在某个集合中 |
groupBy() |
分组 |
orderByAsc() |
升序排序 |
orderByDesc() |
降序排序 |
lambda格式按条件查询
//其一 |
//其二 |
null值处理
UserQuery uq = new UserQuery(); |
查询投影
//普通 |
LambdaQueryWrapper<User> lqw = new LanbdaQueryWrapper<User>(); |
查询投影
MyBatisPlus 查询投影是一种查询方式,主要用于查询部分实体类属性(字段),而不是整个实体类的所有属性。它提高了查询效率,并减少了网络传输和内存消耗。下面是 MyBatisPlus 查询投影的总结:
查询投影可以通过在实体类中定义一个 VO(View Object)类来实现。这个 VO 类只包含我们需要查询的那些属性,而不是整个实体类。
MyBatisPlus 提供了多种查询方式来实现投影查询,包括普通查询、条件构造器查询、Lambda 表达式查询等。
在使用 MyBatisPlus 进行查询时,可以使用
selectOne()、selectList()、selectMaps()等方法实现投影查询。在投影查询中,我们可以使用
select()方法指定要查询的字段,也可以使用excludeColumns()方法排除要查询的字段。投影查询可以使用
@SqlParser(filter = true)注解来关闭逻辑删除功能。这个注解告诉 MyBatisPlus 不要将逻辑删除的行返回给查询结果列表。对于投影查询结果的处理方式,我们可以选择将结果直接映射到实体类中,或者将结果映射到 Map 对象中。
查询条件设置
MyBatisPlus 提供了多种设置查询条件的方式,以下是 MyBatisPlus 查询条件设置的总结:
使用实体类作为查询条件。MyBatisPlus 可以自动地将实体类中的非空字段作为查询条件生成 SQL 语句,并将查询结果映射到实体类中。如果存在多个非空字段,它们之间的默认关系是
AND,可以通过注解方式更改其关系为OR。使用
Wrapper对象作为查询条件。Wrapper类是 MyBatisPlus 提供的一种条件构造器,它可以实现 SQL 语句中常见的条件设置操作,例如eq()(等于)、ne()(不等于)、like()(模糊查询)等。可以使用 Lambda 表达式来构造Wrapper对象,也可以直接使用传统的 SQL 片段。使用
QueryWrapper类作为查询条件。QueryWrapper是 MyBatisPlus 提供的一种常用条件构造器,可以用于设置WHERE条件、排序条件、分组条件等。它支持的查询方式比Wrapper更加灵活,例如支持in()(包含)、between()(在两个值之间)等操作。使用
UpdateWrapper类作为更新条件。UpdateWrapper可以用于设置SET条件,与QueryWrapper类似,也支持 Lambda 表达式和传统的 SQL 片段。使用
LambdaQueryWrapper、LambdaUpdateWrapper等 Lambda 类型的查询方式,实现更加简洁的条件设置,例如lambdaQuery().eq(User::getId, 1)。
映射匹配兼容性
MyBatisPlus 映射匹配兼容性主要指 MyBatisPlus 在进行映射操作时,与传统 MyBatis XML 映射文件的兼容性问题。以下是 MyBatisPlus 映射匹配兼容性的总结:
MyBatisPlus 支持与传统 MyBatis XML 映射文件共存,并且支持使用
@MapperScan注解扫描所有的 Mapper 接口。MyBatisPlus 中内置了多种自动映射配置方式,包括
AUTO(自动按列名匹配)、FULL(自动映射所有实体属性)、NONE(不进行自动映射)等。MyBatisPlus 还支持自定义类型处理器、全局配置、实体类表名映射、字段名映射等灵活的映射配置方式。
在使用 MyBatisPlus 进行开发时,需要注意一些 XML 映射文件中的配置不能与 MyBatisPlus 的自动映射方式冲突,例如
resultMap、association、collection等配置,需要进行合理的调整。对于一些特殊场景,例如需要进行多表关联查询、复杂的查询构造,或者需要使用 MyBatis 动态 SQL 等功能时,可以继续使用传统的 XML 映射文件进行开发。
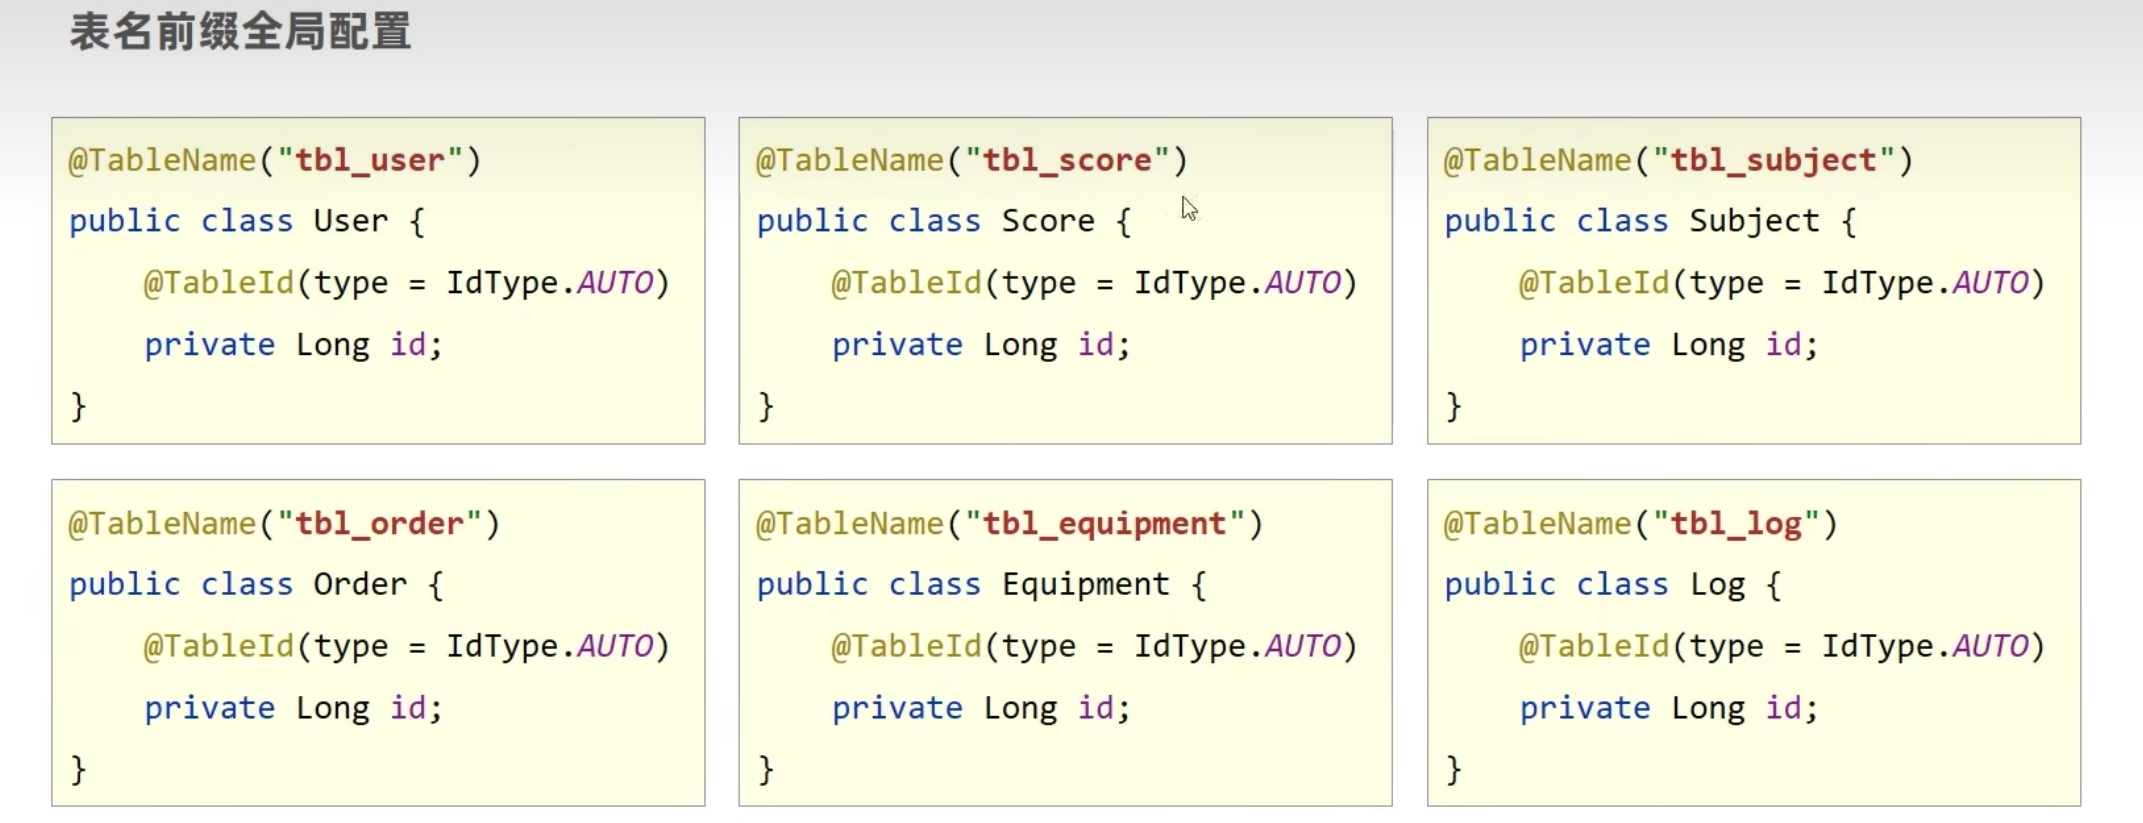
| 注解名称 | 说明 | 应用举例 |
|---|---|---|
@TableId |
主键字段的映射注解,用于标注实体类中主键字段 | @TableId(value = "id", type = IdType.AUTO) 表示将 id 字段设置为自增长主键 |
@TableField |
字段映射注解,在实体类字段上使用,用于设置字段与数据库表中列的映射关系 | @TableField(value = "name", exist = true, update = "false") 表示将 name 字段映射到数据库表的 name 列上,且为非更新字段 |
@TableName |
表名映射注解,用于标注实体类对应的数据库表名 | @TableName("user") 表示将实体类 User 映射到数据库表 user 上 |
@KeySequence |
序列映射注解,用于标注主键对应的序列名称 | @KeySequence(value = "myseq", clazz = Integer.class) 表示将主键对应的序列名称设为 myseq,并指定序列类型为 Integer |
id生成策略
| ID 生成策略 | 说明 |
|---|---|
ASSIGN_ID |
自定义 ID 生成器,需要在代码中自行生成 ID 值 |
ASSIGN_UUID |
UUID 生成器,使用 JDK 自带的 UUID.randomUUID() 方法生成 UUID |
ASSIGN_ID_WORKER |
雪花算法 ID 生成器,使用 Twitter 的 Snowflake 算法生成全局唯一的 ID |
IDENTITY |
基于数据库的自增长 ID 生成器,数据库类型需要支持自增长 |
NONE |
未设置 ID 生成器 |
 |
雪花算法
雪花算法(Snowflake)是一种唯一ID生成算法。它由Twitter公司开发,用于生成全局唯一的ID。雪花算法的核心思想是在64位的ID中,对不同的部分按照规定的位数进行位移和组合,并使用timestamp作为序列的一部分,可以保证生成的ID全局唯一,且越小的timestamp的序列号越小。
雪花算法的ID格式如下:
其中:
第1位(最高位)未使用,可以根据需求使用,一般为0;
第242位表示timestamp,精确到毫秒级别,总共可以表示2^41-1个数字,约69年;52位是机器ID,用于表示生成ID的机器,最多支持2^10=1024个机器;
第43
第53~64位是序列号,用于表示同一毫秒内生成的不同ID,支持每毫秒生成2^12-1个ID。
使用雪花算法生成的ID具有很高的性能和稳定性,适合用于分布式系统中,例如分布式ID生成、分布式锁等场景。

乐观锁
- 在表中添加版本控制字段
首先,需要在表中添加一个版本控制字段,例如在 User 表中添加一个 version 字段:
ALTER TABLE user ADD COLUMN version int NOT NULL DEFAULT 0; |
- 在实体类中添加版本控制字段
接下来,在实体类中添加版本控制字段:
public class User { |
在实体类中,需要添加 @Version 注解,来标识该字段为版本控制字段。
- 在 Mapper 文件中使用乐观锁
在 Mapper 文件中进行更新操作时,可以利用 MyBatisPlus 提供的 @Version 注解自动实现乐观锁功能。以下是一个更新 User 表的简单示例:
<update id="updateById" parameterType="com.example.entity.User"> |
MyBatisPlus代码生成器
MyBatisPlus 提供了一个便捷的代码生成器,可以通过该生成器自动生成 Entity、Mapper、Service 和 Controller 等基础代码,从而加快开发速度,提高效率。以下是 MyBatisPlus 代码生成器的简要总结:
- 配置生成器
在 pom.xml 文件中,添加以下依赖:
<dependencies> |
同时,在 application.yml 或 application.properties 配置文件中,添加自己的数据库连接信息:
spring: |
- 配置代码生成器参数
在项目中创建一个 generator 包,并创建一个 CodeGenerator 类,用于配置代码生成器参数:
public class CodeGenerator { |
在以上代码中,我们可以通过配置相关参数来指定生成器的输出路径、作者名、表名、数据源信息、包路径、策略配置等。在执行 AutoGenerator 对象的 execute() 方法后,MyBatisPlus 就会自动生成相应的 Entity、Mapper、Service 和 Controller 等基础代码,生成的文件都可以在指定的输出路径中找到。

.jpg)
.jpg)
.jpg)
.jpg)
.jpg)